


Stitching with Satin Floss
Satin floss is lustrous and smooth.
It looks very shiny and it gives a luxurious finish to your work, but its wide appeal stems from its silky texture which can challenge a stitcher who’s new to this specialty thread. In few words, it may look a little hostile the very first time you thread you needle and try to make a stitch. Anyway with a little practice and a handful of patience you will have a fantastic result!
Here there are some suggestions to not get crazy while working with it:
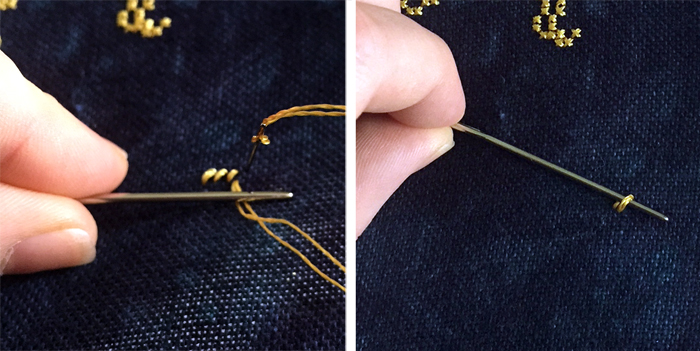
1. First of all, thread you needle with the loop method. This will help you to keep the thread in place when you stitch and still allow to *ouch* unpick the stitches just "unlooping" the thread.

2. As satin thread is very slippery, secure your tails under many stitches both when you start and when you finish your length of thread. This will avoid you thread tail from "slipping away" from your back, that is really annoying. If you're stitching a part with few stitches (like a little bobble), secure it forth and back under two rows of stitches. Prevention is better than a cure.
3. While stitching, push your needle trough the fabric, then hold your thread tighten from the back with the other hand while you push your needle back up. This will keep your stitches tight and in place.

4. If you use to railroad your stitches, sating floss is not easy to railroad. In this case, to help you to keep your stitches flat, you can use a laying tool. If you don't have it, you can just use a big needle (for wool or elastics).
5. If your satin thread becomes twisted while stitching, simply drop the needle and allow the thread to unwind itself. Do it often to keep your thread flat. I also "comb" the thread between my fingers from top to the needle to flatten it and keep back in place the rebel threads (I hope this makes sense in english >.<).
6. Using a thread conditioner like Thread Heaven can also smooth the thread without sacrificing the sheen of the thread. The conditioner will give you more control in placing the threads with more precision. If you don't have a thread conditioner, you can also try moistening the thread with a damp cloth before threading the needle. The threads will quickly dry but will flatten slightly allowing you to stitch more easily.
7. Last but not least, to assure you get the best results, take your time. By stitching slowly you’ll have better control over the placement and laying of your stitches.
You can find all the stitching 101 posts here or you can download them in PDF on our Guides Page


[…] skeins of DMC Satin S3820 Buttercup Satin is the replacement to Rayon. Cloudsfactory has a blog post on how to stitch with […]